

For those who didn’t try the new features yet.
http://blogs.msdn.com/llobo/archive/2009/11/25/concluding-new-wpf-features-series.aspx
http://blogs.msdn.com/llobo/archive/2009/11/19/xaml-2009-features-generics-support.aspx
When I was in net last week end the below links took my attention.The reason was they explain how can we give lambda expressions in XAML.As a developer you might also wonder how the author did that.
It is by creating a custom markup extension and constructing lambda expressions on the fly.
Thanks to M. Orçun Topdağı for such a smart solution.I need to find out another way to implement this in my current project as that is in Silverlight and Silverlight does't support custom mark-up extensions.
Here is one way to format our XAML code in a neat way.In VisualStudio open the Options dialog. Tools->Options.
Goto TextEditor->XAML->Formatting->Spacing and set the options as per the below image.

When I did a WPF training to .net 2.0 audience, it took some more time to explain the concept of Resource dictionaries.The were all familiar to the resource concept in .net and were trying to relate this to the resource files.
What is ResourceDictionary in WPF
WPF resource dictionary is just a collection of objects which are accessible by their corresponding key.
The objects here means anything which are derived from System.Object.Including integers, strings and controls like TextBlock and Buttons. Normally people thinks that ResourceDictionary is something which is related to Window, Styles & Templates.The problem is that we normally use ResourceDictionary along with Styles and Templates.See a simple sample below.
<Window x:Class="Window1"
xmlns="http://schemas.microsoft.com/winfx/2006/xaml/presentation"
xmlns:x="http://schemas.microsoft.com/winfx/2006/xaml"
xmlns:sys="clr-namespace:System;assembly=mscorlib"
Title="Window1">
<Window.Resources>
<sys:Byte x:Key="day">18</sys:Byte>
<sys:String x:Key="month">Apr</sys:String>
<sys:Int32 x:Key="year">1984</sys:Int32>
<TextBlock x:Key="monthtxt"
Text="{StaticResource month}" />
<sys:Double x:Key="fontsize">14</sys:Double>
</Window.Resources>
<StackPanel Orientation="Horizontal">
<TextBlock FontSize="{StaticResource fontsize}"
Text="My DOB :" />
<ContentControl Content="{StaticResource day}" />
<ContentControl Content="{StaticResource monthtxt}" />
<ContentControl Content="{StaticResource year}" />
</StackPanel >
</Window>
Who all can have ResourceDictionary
In simple words who has a property of type ResourceDictionary can hold resources. Here the Resources property defined in one of the base classes called FrameworkElement. Most of the WPF elements are inherited from FrameworkElement and hence they can hold resources.
Accessing objects in ResourceDictionary
There are mainly 2 ways to get objects from ResourceDictionary.One is through XAML with mark-up extension and other through code.The above code shows how to retrieve through the StaticResource markup extension.Another method is through the tag <StaticResource>
<Window x:Class="Window1"
xmlns="http://schemas.microsoft.com/winfx/2006/xaml/presentation"
xmlns:x="http://schemas.microsoft.com/winfx/2006/xaml"
xmlns:sys="clr-namespace:System;assembly=mscorlib">
<Window.Resources>
<sys:String x:Key="fullname">Joy George K</sys:String>
<TextBlock x:Key="nametxt"
Text="{StaticResource fullname}" />
</Window.Resources>
<StackPanel Orientation="Horizontal">
<TextBlock Text="FullName :" />
<StaticResource ResourceKey="nametxt" />
</StackPanel >
</Window>
Dim fullname As String = Me.FindResource("fullname")
If Not String.IsNullOrEmpty(fullname) Then
MessageBox.Show("My FullName :" & fullname)End If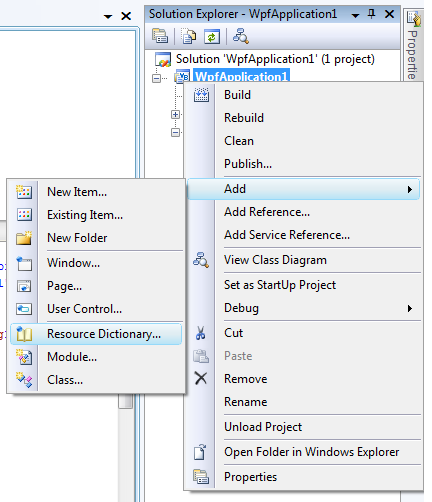
<Window x:Class="Window1"
xmlns="http://schemas.microsoft.com/winfx/2006/xaml/presentation"
xmlns:x="http://schemas.microsoft.com/winfx/2006/xaml"
xmlns:sys="clr-namespace:System;assembly=mscorlib">
<Window.Resources>
<ResourceDictionary>
<ResourceDictionary.MergedDictionaries>
<ResourceDictionary Source="brushes.xaml" />
</ResourceDictionary.MergedDictionaries>
</ResourceDictionary>
</Window.Resources>
<StackPanel Orientation="Horizontal">
<TextBlock Text="FullName : Joy George K"
Background="{StaticResource background}" />
</StackPanel >
</Window>
Static & Dynamic ResourceDictionaries
We have seen the resources are being accessed by a mark-up extension StaticResource. Normally one question comes into our mind as a developer.Is there something called DynamicResource?
Yes.There exists DynamicResource mark-up extension too.Then what are the differences?
The main difference between Static and Dynamic resource mark-up extensions is the value calculation.In StaticResource it is done only once.But in DynamicResource it is done when ever the value of the resource changes.
I know it is difficult to understand.First question will be how to change the value of resource ? Simple .Its by code.
Lets take one example.There is a Brush resource in ResourceDictionary with color white and key backBrush.We have used this brush to give background to 2 StackPanels.One is by StaticResource and another is by DynamicResource mark-up extension.
It will work fine.When we run the application both these StackPanels will have white as background.Now suppose if I change the value of backBrush resource to Red through code what will happen? The answer is .The StackPanel which used DynamicResource will get the Red color and the other will be still in white.Hope this clears.
Refer this sample if you are still in confusion.
Simple but important feature which really help us in real-time applications.Giving different look and feel or colors to alternate rows helps users to differentiate two consecutive rows in a ListBox or ListView.Basically controls which are derived from ItemsControl.
Below xaml code shows how alternate colors are applied into a ListBox
Xaml code to create ListBox with 6 items
<ListBox AlternationCount="2">
<ListBoxItem Content="Item1" />
<ListBoxItem Content="Item2" />
<ListBoxItem Content="Item3" />
<ListBoxItem Content="Item4" />
<ListBoxItem Content="Item5" />
<ListBoxItem Content="Item6" />
</ListBox>
Xaml code of the Style which has the alternate style support.Note the change is in the ItemContainerStyle.Here Style is applied to ListBoxItem
<Style TargetType="{x:Type ListBoxItem}">
<Style.Triggers>
<Trigger Property="ItemsControl.AlternationIndex"
Value="0">
<Setter Property="Background"
Value="LightBlue"></Setter>
</Trigger>
<Trigger Property="ItemsControl.AlternationIndex"
Value="1">
<Setter Property="Background"
Value="LightGreen"></Setter>
</Trigger>
</Style.Triggers>
</Style>
When we run it shows as follows

Description
Here the ItemsControl has got most of the implementation part.It has some members which control the behavior of alternate style.The attached property ItemsControl.AlternationIndex tells the index and according to that we can change color or anything through style.
The Alternation count specifies the frequency.Below code uses 3 as ItemsControl.AlternationCount.See the difference.
Creating ListBox
<ListBox AlternationCount="3">
<ListBoxItem Content="Item1" />
<ListBoxItem Content="Item2" />
<ListBoxItem Content="Item3" />
<ListBoxItem Content="Item4" />
<ListBoxItem Content="Item5" />
<ListBoxItem Content="Item6" />
</ListBox>
Style supports AlternationCount=3
<Style TargetType="{x:Type ListBoxItem}">
<Style.Triggers>
<Trigger Property="ItemsControl.AlternationIndex"
Value="0">
<Setter Property="Background"
Value="LightBlue"></Setter>
</Trigger>
<Trigger Property="ItemsControl.AlternationIndex"
Value="1">
<Setter Property="Background"
Value="LightGreen"></Setter>
</Trigger>
<Trigger Property="ItemsControl.AlternationIndex"
Value="2">
<Setter Property="Background"
Value="LightYellow"></Setter>
</Trigger>
</Style.Triggers>
</Style>

I don't think a sample is needed.
The surface has a launcher application which is launching applications registered with the Surface Shell.Launcher can be activated from any of the 4 access points located at corners of surface.
Registering Microsoft Surface Application
To register an application with Microsoft surface shell we have to copy the application’s xml definitions file into the %PROGRAMDATA%\Microsoft\Surface\Programs folder.This is the folder where surface looks for application definitions.It maintains a list of applications listed here to load on demand by launcher.
Application’s definition file is a simple xml file which describes the application.Common elements included in the definition are
Title : Title of the application
Description:Description about application
Executable: Path to exe.Path need to be absolute.
IconImageFile:Icon of application.
Preview: Preview images
A sample xml file
<?xml version="1.0" encoding="utf-8" ?>
<ss:ApplicationInfo
 xmlns:xsi="http://www.w3.org/2001/XMLSchema-instance"
 xmlns:ss="http://schemas.microsoft.com/Surface/2007/ApplicationMetadata">
  <Application>
    <Title>Test Surface App</Title>
    <Description>This is a test Surface application.</Description>
    <ExecutableFile>%ProgramData%\Microsoft\Surface\Programs\SurfaceApplication1.exe</ExecutableFile>
    <Arguments></Arguments>
    <IconImageFile>%ProgramData%\Microsoft\Surface\Programs\Resources\icon.png</IconImageFile>
    <Preview>
      <PreviewImageFile>%ProgramData%\Microsoft\Surface\Programs\Resources\iconPreview.png</PreviewImageFile>
    </Preview>
  </Application>
</ss:ApplicationInfo>
Surface supports orientation of applications to 2 sides according to the seating position of the user.If we are developing applications we have to rotate our applications our self.Its done by checking the static property Microsoft.Surface.ApplicationLauncher.Orientation.
There is an event called Microsoft.Surface.ApplicationLauncher.OrientationChanged which fires when the user changes his side by clicking on the access buttons at the corresponding side.
Setting the Orientation
We need to have a RotateTransform in our application whose Angle ,we are going to change according to the Orientation.Normally we place the RotateTransform in the root element of the SurfaceWindow.
<s:SurfaceWindow x:Class="SurfaceApplication1.SurfaceWindow1"
    xmlns="http://schemas.microsoft.com/winfx/2006/xaml/presentation"
    xmlns:x="http://schemas.microsoft.com/winfx/2006/xaml"
    xmlns:s="http://schemas.microsoft.com/surface/2008"
    Title="SurfaceApplication1">
  <Grid Name="MenuGrid">
    <Grid.LayoutTransform>
      <RotateTransform x:Name="OrientationTransform" Angle="0"/>
    </Grid.LayoutTransform>
    <TextBlock Name="OrientationTextBox" HorizontalAlignment="Center"/>
   </Grid>
</s:SurfaceWindow>
private void AddActivationHandlers()
{
    // Subscribe to surface application activation events
    ApplicationLauncher.ApplicationActivated += OnApplicationActivated;
    ApplicationLauncher.ApplicationPreviewed += OnApplicationPreviewed;
    ApplicationLauncher.ApplicationDeactivated += OnApplicationDeactivated;
    ApplicationLauncher.OrientationChanged += ApplicationLauncher_OrientationChanged;
}
void ApplicationLauncher_OrientationChanged(object sender, OrientationChangedEventArgs e)
{
    OrientationTransform.Angle = ApplicationLauncher.Orientation == UserOrientation.Top ? 180 : 0;
    OrientationTextBox.Text = ApplicationLauncher.Orientation.ToString();
}
Using Triggers to change the Orientation or Surface application based on ApplicationLauncher.Orientation.
Its clear like water that we can’t use EventTrigger to set the Angle of Transform.Another method is PropertyTrigger.Since the ApplicationLauncher.Orientation is not an AttachedProperty we can’t use that method too.Simply saying we have to write code in order to achieve.I am searching for a method which does the same using xaml alone.If anybody finds,please share with me.
Tags support is the most important feature in Microsoft Surface.Tags enable our application to recognize objects through surface.As you know there are 2 types of tags.Byte tag and identity tag.So before placing objects on the surface to recognize we have to print the tag and stick on the bottom part of the object.Then only surface can identify the tag value through its infrared sensing mechanism.There are 3 ways to visualize the tags.One is using the command line tool GenTag.exe and another using it’s visual tool GenTagUI.exe and last using our own programs which make use of the class IdentityTagGenerator
Using IdentityTag Image Generator
Tool is located at
[Install drive]:\Program Files\Microsoft SDKs\Surface\v1.0\Tools\GenTag\GenTag.exe
Syntax :
GenTag.exe <Series> <Value> <FileName.png> [/dpi:number]
Value and Series are in Hex.This tool outputs the tag as png image.Later we can print that image.Dots Per Inch (dpi) is optional.
Using IdentityTag printing tool
Surface now includes a tool in it’s sdk which helps us to generate and print IdentityTags.You can locate the program in start menu itself
Programs->Microsoft Surface sdk 1.0 sp1->Tools->Identity Tag Printing Tool
or in the location
[Install drive]:\Program Files\Microsoft SDKs\Surface\v1.0\Tools\GenTag\GenTagUI.exe
There is nothing to explain about using the tool I think.Try yourself.
Using IdentityTagGenerator class
Microsoft has provided API to visualize the tags and later we can save or print them.The entry to tag visualization API is IdentityTagGenerator.That class contains 2 static methods for getting tag in it’s actual form.
The usage is straight forward.Seems there is no need to post a sample.
NB: Printed tag should be exactly 1.125 inches square in order to get detected by Surface.
The first Service pack for Microsoft surface has released on May 10.It has got significant changes comparing to the older older.Here are the main features I noticed.
More details here
http://blogs.msdn.com/surface/archive/2009/05/11/service-pack-1-officially-released-today.aspx
http://arstechnica.com/microsoft/news/2009/05/microsoft-surface-sp1-adds-new-features.ars
As a developer, I am more interested in the new controls and will be posting about them later.
I am very happy to see that my previous post “WPF Watermark TextBox using XAML Style” helped a lot of peoples to solve their issues and currently that is the most popular post in my blog.That post describes about creating a WPF watermark textbox by changing it’s style.All the things are done in xaml and there is no property to set the water mark text.
There was a requirement from one of the readers for such a property.ie a Watermark property which decides the watermark text.So rewriting the sample with that property.
Here I just derived a new class called WatemarkTextBox from standard TextBox added a new dependency property called Watermark and defined default style for that control in generic.xaml.The steps are as follows
public class WatermarkTextBox : TextBox
{
    static WatermarkTextBox()
    {
        DefaultStyleKeyProperty.OverrideMetadata(typeof(WatermarkTextBox),
            new FrameworkPropertyMetadata(typeof(WatermarkTextBox)));
    }

    public object Watermark
    {
        get { return (object)GetValue(WatermarkProperty); }
        set { SetValue(WatermarkProperty, value); }
    }
    // Using a DependencyProperty as the backing store for Watermark.  This enables animation, styling, binding, etc...
    public static readonly DependencyProperty WatermarkProperty = DependencyProperty.Register(
        "Watermark",
        typeof(object),
        typeof(WatermarkTextBox),
        new UIPropertyMetadata(null));
}
<Style TargetType="{x:Type local:WatermarkTextBox}">
    <Setter Property="Foreground"
            Value="{DynamicResource {x:Static SystemColors.ControlTextBrushKey}}" />
    <Setter Property="Background"
            Value="{DynamicResource {x:Static SystemColors.WindowBrushKey}}" />
    <Setter Property="BorderBrush"
            Value="Blue" />
    <Setter Property="BorderThickness"
            Value="1" />
    <Setter Property="Padding"
            Value="1" />
    <Setter Property="AllowDrop"
            Value="true" />
    <Setter Property="FocusVisualStyle"
            Value="{x:Null}" />
    <Setter Property="Template">
        <Setter.Value>
            <ControlTemplate TargetType="{x:Type local:WatermarkTextBox}">
                <Grid>
                    <Microsoft_Windows_Themes:ListBoxChrome x:Name="Bd"
                                                            SnapsToDevicePixels="true"
                                                            Background="{TemplateBinding Background}"
                                                            BorderBrush="{TemplateBinding BorderBrush}"
                                                            BorderThickness="{TemplateBinding BorderThickness}"
                                                            RenderFocused="{TemplateBinding IsKeyboardFocusWithin}"
                                                            RenderMouseOver="{TemplateBinding IsMouseOver}">
                        <ScrollViewer x:Name="PART_ContentHost"
                                      SnapsToDevicePixels="{TemplateBinding SnapsToDevicePixels}" />
                    </Microsoft_Windows_Themes:ListBoxChrome>
                    <TextBlock x:Name="textBlock"
                               Opacity="0.345"
                               Text="{TemplateBinding Watermark}"
                               TextWrapping="Wrap"
                               Visibility="Hidden" />
                </Grid>
                <ControlTemplate.Triggers>
                    <MultiTrigger>
                        <MultiTrigger.Conditions>
                            <Condition Property="IsFocused"
                                       Value="False" />
                            <Condition Property="Text"
                                       Value="" />
                        </MultiTrigger.Conditions>
                        <Setter Property="Visibility"
                                TargetName="textBlock"
                                Value="Visible" />
                    </MultiTrigger>
                </ControlTemplate.Triggers>
            </ControlTemplate>
        </Setter.Value>
    </Setter>
</Style>
Download sample from here.
